Linux Oracle 11g R2 - RAC + ASM VirtualBox 安裝
Linux 版本
[root@node1 ~]# uname -rm
2.6.18-164.el5 i686
[root@node1 ~]# cat /etc/*-release
Enterprise Linux Enterprise Linux Server release 5.4 (Carthage)
Red Hat 4
11GR2 32位元
安裝大致流程如下
1.分配網路IP
2.設定Linux 系統參數
3.分割硬碟
4.安裝ASM
5.安裝Grid
6.安裝11GR2 database software
7.建立db
1.在兩節點先建立用戶與群組
[root@node1 ~]# groupadd -g 501 oinstall
[root@node1 ~]# groupadd -g 502 dba
[root@node1 ~]# useradd -u 501 -g oinstall -G dba oracle
[root@node1 ~]# passwd oracle
## 用戶修改群組
usermod -g oinstall oracle
2.在兩節點建立oracle資料夾
[root@node1 ~]# mkdir /u01/oracle
[root@node1 ~]# mkdir /u01/grid
[root@node1 ~]# chown -R oracle:oinstall /u01
3.配置主機名稱
[root@node1 ~]# vi /etc/sysconfig/network
節點1
節點2
4..在兩節點設置hosts
[root@node1 ~]# vi /etc/hosts
11G還須配置一個SCAN專用IP給它
修改網卡IP
vi /etc/sysconfig/network-script/ifcfg-eth0
vi /etc/sysconfig/network-script/ifcfg-eth1
5.修改Linux參數
[root@node1 ~]# vi /etc/sysctl.conf
在文件的最後加上
kernel.shmmax = 4398046511104
kernel.shmall = 1073741824
kernel.shmmni = 4096
kernel.sem = 250 32000 100 128
net.ipv4.ip_local_port_range = 9000 65500
net.core.rmem_default = 262144
net.core.rmem_max = 4194304
net.core.wmem_default = 262144
net.core.wmem_max = 1048576
fs.aio-max-nr = 1048576
fs.file-max = 6815744
主機 記憶體128G 配置
--128*1024*1024*1024*90% = 123695058124
--123695058124 /4096 = 30198988
kernel.shmmax = 123695058124
kernel.shmall = 30198988
kernel.shmmni = 4096
kernel.sem = 250 32000 100 128
net.ipv4.ip_local_port_range = 9000 65500
fs.aio-max-nr = 1048576
fs.file-max = 6815744
net.ipv4.ipfrag_high_thresh = 16777216
net.ipv4.ipfrag_low_thresh = 15728640
net.ipv4.ipfrag_time = 60
net.core.rmem_max=26214400
net.core.wmem_max=26214400
net.core.rmem_default=262144
net.core.wmem_default=262144
net.core.netdev_max_backlog=10000
主機 記憶體256G 配置
kernel.shmmax = 247390116249
kernel.shmall = 60397977
kernel.shmmni = 4096
kernel.sem = 250 32000 100 128
net.ipv4.ip_local_port_range = 9000 65500
fs.aio-max-nr = 1048576
fs.file-max = 6815744
net.ipv4.ipfrag_high_thresh = 16777216
net.ipv4.ipfrag_low_thresh = 15728640
net.ipv4.ipfrag_time = 60
net.core.rmem_max=26214400
net.core.wmem_max=26214400
net.core.rmem_default=262144
net.core.wmem_default=262144
net.core.netdev_max_backlog=10000
重新掛載生效
[root@rac1 ~]# sysctl -p
使用 yum 安裝 rpm
yum -y install gcc*
yum -y install libaio-devel*
yum -y install compat-libstdc++*
yum -y install elfutils-libelf-devel*
yum -y install libstdc++*
yum -y install ksh*
6.修改兩節點的用戶限制
[root@node1 ~]# vi /etc/security/limits.conf
文件最後加上
oracle soft nofile 2047
oracle hard nofile 65536
oracle soft nproc 2047
oracle hard nproc 16384
oracle soft stack 10240
oracle hard stack 32768
7.修改兩節點的 /etc/pam.d/login
[root@node1 ~]# vi /etc/pam.d/login
文件最後加上
session required /lib64/security/pam_limits.so
8.分割硬碟
配置完三個硬碟(sdb1、sdc1、sdd1) 後,不要格式化
9.兩節點同步一下硬碟訊息
[root@node1 ~]# partprobe
[root@node1 ~]# ls /dev/sd*
/dev/sda /dev/sda2 /dev/sdb /dev/sdc /dev/sdd /dev/sde
/dev/sda1 /dev/sda3 /dev/sdb1 /dev/sdc1 /dev/sdd1 /dev/sde1
10.安裝 oracleasmlib 程式包
依照 Linux 的版本下載RPM
http://www.oracle.com/technetwork/topics/linux/asmlib/index-101839.html
1.oracleasm-support
oracleasm-support-2.1.8-1.el5.i386.rpm
2.oracleasm
oracleasm-2.6.18-164.el5-2.0.5-1.el5.i686.rpm
3.asmlib
oracleasmlib-2.0.4-1.el5.i386.rpm
11.新增裸設備
a
因為我們這邊使用asmlib 所以第11 可以跳過
以下是自動產生裸設備的UDEV 的語法
[root@node1 grid]#
for i in a b c d e f g;
do
echo "KERNEL==\"sd*\", BUS==\"scsi\", PROGRAM==\"/sbin/scsi_id -g -u -s %p\", RESULT==\"`scsi_id -g -u -s /block/sd$i`\", NAME=\"asm-disk$i\", OWNER=\"oracle\", GROUP=\"oinstall\", MODE=\"0660\""
done
把產生結果貼到 /etc/udev/rules.d/99-oracle-asmdevices.rules 去
[root@node1 grid]# vi /etc/udev/rules.d/99-oracle-asmdevices.rules
KERNEL=="sd*", BUS=="scsi", PROGRAM=="/sbin/scsi_id -g -u -s %p", RESULT=="SATA_VBOX_HARDDISK_VB68bef045-aa1801db_", NAME="raw1", OWNER="oracle", GROUP="oinstall", MODE="0660"
KERNEL=="sd*", BUS=="scsi", PROGRAM=="/sbin/scsi_id -g -u -s %p", RESULT=="SATA_VBOX_HARDDISK_VBf301e72f-8895ea4f_", NAME="raw2", OWNER="oracle", GROUP="oinstall", MODE="0660"
KERNEL=="sd*", BUS=="scsi", PROGRAM=="/sbin/scsi_id -g -u -s %p", RESULT=="SATA_VBOX_HARDDISK_VB91e82c7f-0105b071_", NAME="raw3", OWNER="oracle", GROUP="oinstall", MODE="0660"
重新掛載服務
start_udev
驗證
ls /dev/raw/ -l

12. 在兩節點分別配置ASM
[root@node1 ~]# /etc/init.d/oracleasm configure
13.建立 asm 硬碟:
[root@rac1 ~]# /etc/init.d/oracleasm enable
[root@rac2 ~]# /etc/init.d/oracleasm enable
在某一節點執行以下指令
[root@node1 ~]# /etc/init.d/oracleasm createdisk DATA1 /dev/sdb1
[root@node1 ~]# /etc/init.d/oracleasm createdisk DATA2 /dev/sdc1
[root@node1 ~]# /etc/init.d/oracleasm createdisk DATA3 /dev/sdd1
假如出現 Marking disk "xxxxx" as an ASM disk FAILED 錯誤的話
1.有安裝過RAC, 執行
dd if=/dev/zero of=/dev/sda1 bs=1024k count=1
清空硬碟資訊
2.沒安裝過RAC, 查看selinux是否開啟,執行
getenforce
出現Enforcing, 表示開啟
並修改vi /etc/selinux/config , 將selinux 改為disabled
SELINUX=disabled
14.掃描 asm 硬碟
每個節點都要執行
[root@node1 ~]# /etc/init.d/oracleasm scandisks
[root@node1 ~]# /etc/init.d/oracleasm listdisks
兩節點都要出現剛剛建立的asmdisks,假如其他節點沒有出現的話,就要檢查網路與硬碟是否設定正確
15.手動配置ssh
在安裝Clusterware和 Rac Database 時,在這過程中會以Oracle身分自動複製檔案到Rac各個節點去,在這裡我們配置ssh 讓Oracle用戶不用輸入密碼就可以有訪問各節點的能力,所以我們需要用Oracle身分建立各節點的公鑰匙
我們必須確保各節點間網路是暢通的
ping node1
ping node2
ping node1-priv
ping node2-priv
在來先在node1執行,密碼不用輸入
node2 執行,密碼不用輸入
互相交換公鑰
先在node1執行,傳送檔案到node2時會要求輸入node2的密碼
node2 回拋檔案到node1後,就可以測試看看有無成功
兩節點互相測試看看是否還需要輸入密碼
[oracle@node1 ~]$ ssh node1 date
[oracle@node1 ~]$ ssh node2 date
[oracle@node1 ~]$ ssh node1-priv date
[oracle@node1 ~]$ ssh node2-priv date
換node2 執行
[oracle@node2 ~]$ ssh node1 date
[oracle@node2 ~]$ ssh node2 date
[oracle@node2 ~]$ ssh node1-priv date
[oracle@node2 ~]$ ssh node2-priv date
執行成功就會出現以下畫面
16.安裝Grid Infrastructure
SCAN Name 是 /etc/hosts 配置的SCAN 名
新增節點,名稱也是按照 /etc/host去輸入
測試SSH 是否通行
檢查網路是否正確
選擇ASM所使用的硬碟組
按下按鈕來手動選擇ASM DISK, Linux Enterprise 5建立的ASM DISK 在 /dev/oracleasm/disks/ 底下
這邊選擇一個ASM DISK 當作 OCR+Voting 的存放位置 (10g 可以分別放置不同的ASM DISK, 11g 預設是放在同一個DISK, 安裝結束後可以透過設定來分開存放)
輸入ASM 管理的密碼
Grid Infrastructure 安裝的位置必須不同於Oracle Base安裝的位置
檢查軟體與硬體配置,發現缺少的Packages
安裝完缺少的rpm後與把所有的警告解決,我這台電腦記憶體不足才會出現Physical Memory 警告,這邊就先略過
開始安裝
安裝到最後要求在各節點使用root執行兩個程式
orainstRoot.sh
[root@node1 oraInventory]# ./orainstRoot.sh
Changing permissions of /u01/oraInventory.
Adding read,write permissions for group.
Removing read,write,execute permissions for world.
Changing groupname of /u01/oraInventory to oinstall.
The execution of the script is complete.
root.sh
[root@node1 grid]# ./root.sh
Running Oracle 11g root.sh script...
The following environment variables are set as:
ORACLE_OWNER= oracle
ORACLE_HOME= /u01/grid
Enter the full pathname of the local bin directory: [/usr/local/bin]:
Copying dbhome to /usr/local/bin ...
Copying oraenv to /usr/local/bin ...
Copying coraenv to /usr/local/bin ...
Creating /etc/oratab file...
Entries will be added to the /etc/oratab file as needed by
Database Configuration Assistant when a database is created
Finished running generic part of root.sh script.
Now product-specific root actions will be performed.
2014-05-07 13:31:50: Parsing the host name
2014-05-07 13:31:50: Checking for super user privileges
2014-05-07 13:31:50: User has super user privileges
Using configuration parameter file: /u01/grid/crs/install/crsconfig_params
Creating trace directory
LOCAL ADD MODE
Creating OCR keys for user 'root', privgrp 'root'..
Operation successful.
root wallet
root wallet cert
root cert export
peer wallet
profile reader wallet
pa wallet
peer wallet keys
pa wallet keys
peer cert request
pa cert request
peer cert
pa cert
peer root cert TP
profile reader root cert TP
pa root cert TP
peer pa cert TP
pa peer cert TP
profile reader pa cert TP
profile reader peer cert TP
peer user cert
pa user cert
Adding daemon to inittab
CRS-4123: Oracle High Availability Services has been started.
ohasd is starting
CRS-2672: Attempting to start 'ora.gipcd' on 'node1'
CRS-2672: Attempting to start 'ora.mdnsd' on 'node1'
CRS-2676: Start of 'ora.gipcd' on 'node1' succeeded
CRS-2676: Start of 'ora.mdnsd' on 'node1' succeeded
CRS-2672: Attempting to start 'ora.gpnpd' on 'node1'
CRS-2676: Start of 'ora.gpnpd' on 'node1' succeeded
CRS-2672: Attempting to start 'ora.cssdmonitor' on 'node1'
CRS-2676: Start of 'ora.cssdmonitor' on 'node1' succeeded
CRS-2672: Attempting to start 'ora.cssd' on 'node1'
CRS-2672: Attempting to start 'ora.diskmon' on 'node1'
CRS-2676: Start of 'ora.diskmon' on 'node1' succeeded
CRS-2676: Start of 'ora.cssd' on 'node1' succeeded
CRS-2672: Attempting to start 'ora.ctssd' on 'node1'
CRS-2676: Start of 'ora.ctssd' on 'node1' succeeded
ASM created and started successfully.
DiskGroup OCR created successfully.
clscfg: -install mode specified
Successfully accumulated necessary OCR keys.
Creating OCR keys for user 'root', privgrp 'root'..
Operation successful.
CRS-2672: Attempting to start 'ora.crsd' on 'node1'
CRS-2676: Start of 'ora.crsd' on 'node1' succeeded
CRS-4256: Updating the profile
Successful addition of voting disk 04e3aa63f8d14f67bffa44401277fdb9.
Successfully replaced voting disk group with +OCR.
CRS-4256: Updating the profile
CRS-4266: Voting file(s) successfully replaced
## STATE File Universal Id File Name Disk group
-- ----- ----------------- --------- ---------
1. ONLINE 04e3aa63f8d14f67bffa44401277fdb9 (/dev/oracleasm/disks/OCR) [OCR]
Located 1 voting disk(s).
CRS-2673: Attempting to stop 'ora.crsd' on 'node1'
CRS-2677: Stop of 'ora.crsd' on 'node1' succeeded
CRS-2673: Attempting to stop 'ora.asm' on 'node1'
CRS-2677: Stop of 'ora.asm' on 'node1' succeeded
CRS-2673: Attempting to stop 'ora.ctssd' on 'node1'
CRS-2677: Stop of 'ora.ctssd' on 'node1' succeeded
CRS-2673: Attempting to stop 'ora.cssdmonitor' on 'node1'
CRS-2677: Stop of 'ora.cssdmonitor' on 'node1' succeeded
CRS-2673: Attempting to stop 'ora.cssd' on 'node1'
CRS-2677: Stop of 'ora.cssd' on 'node1' succeeded
CRS-2673: Attempting to stop 'ora.gpnpd' on 'node1'
CRS-2677: Stop of 'ora.gpnpd' on 'node1' succeeded
CRS-2673: Attempting to stop 'ora.gipcd' on 'node1'
CRS-2677: Stop of 'ora.gipcd' on 'node1' succeeded
CRS-2673: Attempting to stop 'ora.mdnsd' on 'node1'
CRS-2677: Stop of 'ora.mdnsd' on 'node1' succeeded
CRS-2672: Attempting to start 'ora.mdnsd' on 'node1'
CRS-2676: Start of 'ora.mdnsd' on 'node1' succeeded
CRS-2672: Attempting to start 'ora.gipcd' on 'node1'
CRS-2676: Start of 'ora.gipcd' on 'node1' succeeded
CRS-2672: Attempting to start 'ora.gpnpd' on 'node1'
CRS-2676: Start of 'ora.gpnpd' on 'node1' succeeded
CRS-2672: Attempting to start 'ora.cssdmonitor' on 'node1'
CRS-2676: Start of 'ora.cssdmonitor' on 'node1' succeeded
CRS-2672: Attempting to start 'ora.cssd' on 'node1'
CRS-2672: Attempting to start 'ora.diskmon' on 'node1'
CRS-2676: Start of 'ora.diskmon' on 'node1' succeeded
CRS-2676: Start of 'ora.cssd' on 'node1' succeeded
CRS-2672: Attempting to start 'ora.ctssd' on 'node1'
CRS-2676: Start of 'ora.ctssd' on 'node1' succeeded
CRS-2672: Attempting to start 'ora.asm' on 'node1'
CRS-2676: Start of 'ora.asm' on 'node1' succeeded
CRS-2672: Attempting to start 'ora.crsd' on 'node1'
CRS-2676: Start of 'ora.crsd' on 'node1' succeeded
CRS-2672: Attempting to start 'ora.evmd' on 'node1'
CRS-2676: Start of 'ora.evmd' on 'node1' succeeded
CRS-2672: Attempting to start 'ora.asm' on 'node1'
CRS-2676: Start of 'ora.asm' on 'node1' succeeded
CRS-2672: Attempting to start 'ora.OCR.dg' on 'node1'
CRS-2676: Start of 'ora.OCR.dg' on 'node1' succeeded
CRS-2672: Attempting to start 'ora.registry.acfs' on 'node1'
CRS-2676: Start of 'ora.registry.acfs' on 'node1' succeeded
node1 2014/05/07 13:41:30 /u01/grid/cdata/node1/backup_20140507_134130.olr
Configure Oracle Grid Infrastructure for a Cluster ... succeeded
Updating inventory properties for clusterware
Starting Oracle Universal Installer...
Checking swap space: must be greater than 500 MB. Actual 2980 MB Passed
The inventory pointer is located at /etc/oraInst.loc
The inventory is located at /u01/oraInventory
'UpdateNodeList' was successful.
[root@node1 grid]#
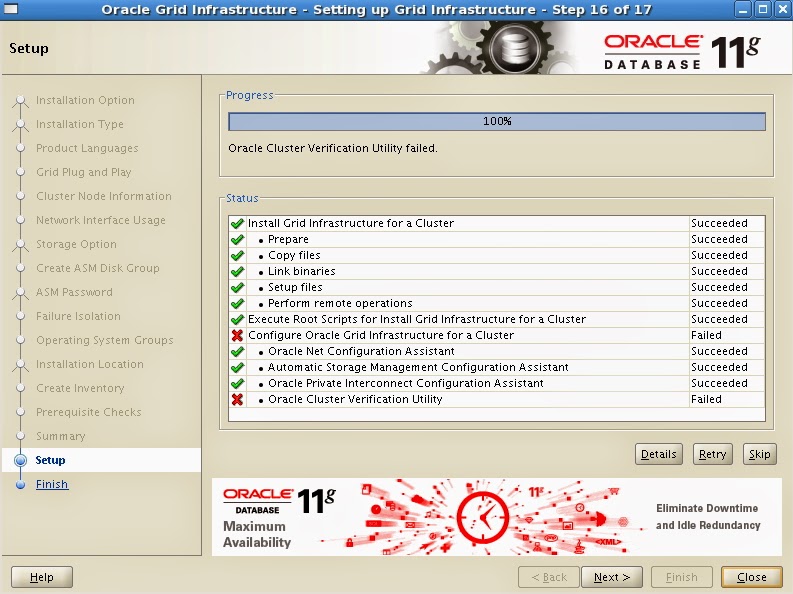
18.安裝的最後出現了錯誤 [INS-20802] Oracle Cluster Verification Utility failed.
查看一下log /u01/oraInventory/logs/installActions2014-04-21_01-32-02PM.log
INFO: Checking Single Client Access Name (SCAN)...
INFO: Checking name resolution setup for "scan.cluster.com"...
INFO: ERROR:
INFO: PRVF-4664 : Found inconsistent name resolution entries for SCAN name "scan.cluster.com"
INFO: ERROR:
INFO: PRVF-4657 : Name resolution setup check for "scan.cluster.com" (IP address: 192.168.56.111) failed
INFO: ERROR:
INFO: PRVF-4664 : Found inconsistent name resolution entries for SCAN name "scan.cluster.com"
INFO: Verification of SCAN VIP and Listener setup failed
上網查了一下,發現這是因為是在/etc/hosts中配置了SCAN的IP,
手動ping這個IP,如果可以成功,則這個錯誤可以忽略。
19.安裝結束後檢查兩節點群集
20. 安裝 11g R2 database
只安裝database software,等等再利用dbca 建立db
SSH 連接測試
在這邊一樣略過警告
開始進行安裝
安裝的最後會提示在兩節點執行程式,執行完後按下OK
安裝成功
21.再建立DB 前還需建立 DATA 存放的 ASM DISK
[oracle@node1 grid]# asmca
建立一個group 裡頭分配兩個asm disk , 來存放data file
再建立一個asm disk group 做為db 的 flash_recovery_area 用
22.再利用DBCA建立新DB,選擇第一個
選擇剛剛建立的+DATA並輸入安裝Grid Infrastructure時輸入的ASM管理密碼
配置 flash_recovery_area 專用的asm disk group
DB概要
DB 建立成功
登入sqlplus 檢查
node1
node2
*****************
Oracle 官方建議 linux 主機上 開啟 HugePages 功能且關閉 Transparent HugePages
1.查看 Transparent HugePages
[root@ora-35 ~]# cat /sys/kernel/mm/redhat_transparent_hugepage/enabled
[always] madvise never
[root@ora-35 ~]#
[root@ora-35 ~]#
[root@ora-35 ~]#
[root@ora-35 ~]# cat /etc/rc.local
#!/bin/sh
#
# This script will be executed *after* all the other init scripts.
# You can put your own initialization stuff in here if you don't
# want to do the full Sys V style init stuff.
touch /var/lock/subsys/local
[root@ora-35 ~]#
2. 禁用 transparent_hugepage,在 /etc/rc.local 加入
if test -f /sys/kernel/mm/transparent_hugepage/enabled; then
echo never > /sys/kernel/mm/transparent_hugepage/enabled
fi
if test -f /sys/kernel/mm/transparent_hugepage/defrag; then
echo never > /sys/kernel/mm/transparent_hugepage/defrag
fi
[root@ora-35 ~]# cat /etc/rc.local
#!/bin/sh
#
# This script will be executed *after* all the other init scripts.
# You can put your own initialization stuff in here if you don't
# want to do the full Sys V style init stuff.
touch /var/lock/subsys/local
if test -f /sys/kernel/mm/transparent_hugepage/enabled; then
echo never > /sys/kernel/mm/transparent_hugepage/enabled
fi
if test -f /sys/kernel/mm/transparent_hugepage/defrag; then
echo never > /sys/kernel/mm/transparent_hugepage/defrag
fi
3.以上做完需要重啟系統,,,, 以下指令執行完可以直接禁用不用重啟
[root@ora-35 ~]#
[root@ora-35 ~]# echo never > /sys/kernel/mm/redhat_transparent_hugepage/enabled
[root@ora-35 ~]#
[root@ora-35 ~]#
[root@ora-35 ~]#
[root@ora-35 ~]# cat /sys/kernel/mm/redhat_transparent_hugepage/enabled
always madvise [never]
[root@ora-35 ~]#
[root@ora-35 ~]#
4.開啟 HugePages
-- 先配置參數
cat /etc/security/limits.conf
grid soft memlock 209715200
grid hard memlock 209715200
oracle soft memlock 209715200
oracle hard memlock 209715200
[root@ora-35 script]# cat hugepages_settings.sh
#!/bin/bash
#
# hugepages_settings.sh
#
# Linux bash script to compute values for the
# recommended HugePages/HugeTLB configuration
# on Oracle Linux
#
# Note: This script does calculation for all shared memory
# segments available when the script is run, no matter it
# is an Oracle RDBMS shared memory segment or not.
#
# This script is provided by Doc ID 401749.1 from My Oracle Support
# http://support.oracle.com
# Welcome text
echo "
This script is provided by Doc ID 401749.1 from My Oracle Support
(http://support.oracle.com) where it is intended to compute values for
the recommended HugePages/HugeTLB configuration for the current shared
memory segments on Oracle Linux. Before proceeding with the execution please note following:
* For ASM instance, it needs to configure ASMM instead of AMM.
* The 'pga_aggregate_target' is outside the SGA and
you should accommodate this while calculating SGA size.
* In case you changes the DB SGA size,
as the new SGA will not fit in the previous HugePages configuration,
it had better disable the whole HugePages,
start the DB with new SGA size and run the script again.
And make sure that:
* Oracle Database instance(s) are up and running
* Oracle Database 11g Automatic Memory Management (AMM) is not setup
(See Doc ID 749851.1)
* The shared memory segments can be listed by command:
# ipcs -m
Press Enter to proceed..."
read
# Check for the kernel version
KERN=`uname -r | awk -F. '{ printf("%d.%d\n",$1,$2); }'`
# Find out the HugePage size
HPG_SZ=`grep Hugepagesize /proc/meminfo | awk '{print $2}'`
if [ -z "$HPG_SZ" ];then
echo "The hugepages may not be supported in the system where the script is being executed."
exit 1
fi
# Initialize the counter
NUM_PG=0
# Cumulative number of pages required to handle the running shared memory segments
for SEG_BYTES in `ipcs -m | cut -c44-300 | awk '{print $1}' | grep "[0-9][0-9]*"`
do
MIN_PG=`echo "$SEG_BYTES/($HPG_SZ*1024)" | bc -q`
if [ $MIN_PG -gt 0 ]; then
NUM_PG=`echo "$NUM_PG+$MIN_PG+1" | bc -q`
fi
done
RES_BYTES=`echo "$NUM_PG * $HPG_SZ * 1024" | bc -q`
# An SGA less than 100MB does not make sense
# Bail out if that is the case
if [ $RES_BYTES -lt 100000000 ]; then
echo "***********"
echo "** ERROR **"
echo "***********"
echo "Sorry! There are not enough total of shared memory segments allocated for
HugePages configuration. HugePages can only be used for shared memory segments
that you can list by command:
# ipcs -m
of a size that can match an Oracle Database SGA. Please make sure that:
* Oracle Database instance is up and running
* Oracle Database 11g Automatic Memory Management (AMM) is not configured"
exit 1
fi
# Finish with results
case $KERN in
'2.2') echo "Kernel version $KERN is not supported. Exiting." ;;
'2.4') HUGETLB_POOL=`echo "$NUM_PG*$HPG_SZ/1024" | bc -q`;
echo "Recommended setting: vm.hugetlb_pool = $HUGETLB_POOL" ;;
'2.6') echo "Recommended setting: vm.nr_hugepages = $NUM_PG" ;;
'3.8') echo "Recommended setting: vm.nr_hugepages = $NUM_PG" ;;
'3.10') echo "Recommended setting: vm.nr_hugepages = $NUM_PG" ;;
'4.1') echo "Recommended setting: vm.nr_hugepages = $NUM_PG" ;;
esac
# End
-------
[root@ora-35 script]# ./hugepages_settings.sh
This script is provided by Doc ID 401749.1 from My Oracle Support
(http://support.oracle.com) where it is intended to compute values for
the recommended HugePages/HugeTLB configuration for the current shared
memory segments on Oracle Linux. Before proceeding with the execution please note following:
* For ASM instance, it needs to configure ASMM instead of AMM.
* The 'pga_aggregate_target' is outside the SGA and
you should accommodate this while calculating SGA size.
* In case you changes the DB SGA size,
as the new SGA will not fit in the previous HugePages configuration,
it had better disable the whole HugePages,
start the DB with new SGA size and run the script again.
And make sure that:
* Oracle Database instance(s) are up and running
* Oracle Database 11g Automatic Memory Management (AMM) is not setup
(See Doc ID 749851.1)
* The shared memory segments can be listed by command:
# ipcs -m
Press Enter to proceed...
Recommended setting: vm.nr_hugepages = 50692
-------
[root@ora-36 11.2.4]# vi /etc/sysctl.conf
----------
[root@ora-36 11.2.4]# grep Huge /proc/meminfo
AnonHugePages: 22528 kB
HugePages_Total: 50692
HugePages_Free: 50692
HugePages_Rsvd: 0
HugePages_Surp: 0
Hugepagesize: 2048 kB
---------- 這邊重開DB
[oracle@ora-36 ~]$ grep Huge /proc/meminfo
AnonHugePages: 22528 kB
HugePages_Total: 50692
HugePages_Free: 41914
HugePages_Rsvd: 41911
HugePages_Surp: 0
Hugepagesize: 2048 kB
且 alert.log 中可以看到相關訊息
Starting ORACLE instance (normal)
************************ Large Pages Information *******************
Per process system memlock (soft) limit = 200 GB
Total Shared Global Region in Large Pages = 99 GB (100%)
Large Pages used by this instance: 50689 (99 GB)
Large Pages unused system wide = 3 (6144 KB)
Large Pages configured system wide = 50692 (99 GB)
Large Page size = 2048 KB
********************************************************************
就可以看到 已經在使用囉